Wednesday, April 25, 1973

How I Draw

Updated July 2009

As can be seen from my drawings, I'm not a trained artist. I just love to draw and color. Most of the time, I do a line drawing, then color it with my markers. Sometimes I start with a pencil sketch or rough layout, but not always. Sometimes I draw and color alternately.

When I'm not drawing "from life," my drawings often begin with what I call a gesture. An arm movement. A line on a page. That leads to another gesture, another line. At some point, I start to add lines that fit with the lines I already have. Sometimes it begins to look like "something," and I make it look more like that. (Example: Mary 1 of 12) Often I don't know what I'm drawing until I'm well into it, and sometimes when I'm done, I still don't know what it's supposed to be. (Example: Flower or...?) That doesn't bother me.

Do I always end up with a great drawing, even by my standards? No. And it can be an uncomfortable process. A few months ago, I wrote to my friend Sybil:
"For about half of my drawings, there is a point where I think that it's ugly, unfinishable, unsalvageable. I have the strong urge to rip it up. But I've learned to take a breath, turn the paper around, let myself 'commune' with what is there, and wait for it to tell me what it needs. Another line, another color, some shading or whatever. And if I don't rush it, don't get anxious, don't just do 'something, anything' to make it stop - then it turns out beautiful in its own way. And that's my secret for artistic success. I let it be what it is. For some reason, that works for me with lines & markers, but not with crayons or paint or colored pencil."
Another note to Sybil, on a similar topic:
"After I finish a picture that that is near the top of my current 'artistic' capabilities, like the iris, I'm much more critical of the next one, like the gaudy fish. After the subtle, complex shading in the iris, I wanted to make something simple and bright (really bright!), and I did. But when it (the fish) was done, part of me was disappointed, and I had to remind myself that I enjoyed making it, that not every drawing needs to be a pinnacle."


Tuesday, April 24, 1973

Anybody Can Draw and "Try This" Introduction

Updated July 2009

I truly believe that anybody can draw. Yes, that means you. You may not want to draw, and that's fine. But I've talked with many people who have a bit of a longing to draw, or who loved coloring and drawing as children, and who think they can't draw.

If, to you, "a drawing" means "a realistic and convincing detailed portrait" - then maybe it's true, you can't draw that. I can't draw that either. Other things I can't draw (yet) include ovals that aren't wobbly and people with the right length arms. But that doesn't stop me. I love to draw, even when I'm not very good at it. With practice and a few resources to learn from, my skills and my satisfaction increase.

What I mean by "anybody can draw" is the activity of drawing. Moving a pencil or pen across the paper, making shapes, and coloring them. It's extremely relaxing, absorbing, and enjoyable for me. You can do that, too.

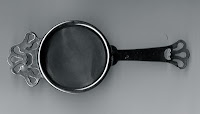
For example, take an object with an interesting shape, maybe something from the kitchen, like this tea strainer, and trace around part or all of it. Move it to a different angle on the paper, and trace it again. Add some lines to echo the shapes you just drew. Color it in.

Now you have a drawing. Click here to see what my drawing looked like.

If the 8.5 x 11" page seems too big, draw a 4 x 6" rectangle and work inside that frame for your drawing space. Or use an unruled 4 x 6" index card.

For some of my drawings that I think might be simple and interesting to try for yourself, I wrote easy "how to" directions, with links and a "try this" label. Click on "try this" and then scroll down to give it a try! Please don't copy my work exactly, but do feel free to play with the ideas, creating a new drawing of your own.

You can get started with everyday, inexpensive materials. Almost all of my 1974-76 drawings, plus the bright bird from 1985, were done with just a black Sharpie (try the ultra-fine point) and a set of 24 fine-point Pentel water based markers (called color pens), which work fine with ordinary printer/copier paper or index cards. It's a good way to see if you enjoy the activity of drawing and coloring. (Caution: don't use Copic markers with Sharpies - it will smear.)

If you're a beginner at drawing, and you want to improve your skills, there are many resources to help you. I've listed a few of them here.

Sunday, April 22, 1973

Resources for Drawing

Updated January 2012

There are many resources to help beginners develop their drawing skills, confidence, and enjoyment. I would call myself an "advanced beginner" who is learning with every drawing.

My favorite resource for drawing is a book, Drawing on the Right Side of the Brain, by Betty Edwards. I purchased it in 1981, so I listed the title that I have. The current edition is The New Drawing on the Right Side of the Brain. I can't comment on the validity of her brain science, but the drawing exercises are wonderful. A non-threatening approach to improve your seeing and your ability to "draw what you see."

I've also made use of some internet resources, including:
  • I Like Markers - Draw It Yourself posts - start here, and then for more, click on the DIY label at the end of the post
  • Start Art Tutorials
  • Drawspace Drawing Lessons (some require registration)
  • The Figure Drawing Lab - University of Evansville
  • Illustration Friday - A weekly word to inspire a drawing. Click here to see my "Illustration Friday inspired" posts.
  • Mixed Media Monday - Another weekly word to inspire (updated Jan. 1, 2012: the weekly MMM words ended in March 2011, but the past words and submissions are still posted)

Saturday, April 21, 1973

Try This - Tea Strainer 1 (Full Shapes)

Updated July 2009

First, please read my post, "Anybody Can Draw," if you haven't already. And please don't copy my drawing - but do feel free to use it to inspire your own.

If you're looking for the "try this" version with partial shapes, see the "Anybody Can Draw" post.

For this drawing, use the full 8.5 x 11" page. Select one or two objects with interesting shapes to trace - my tea strainer is just an example. Maybe a pair of scissors, a serving fork with a fancy shaped handle, a pair of eyeglasses folded up, a kitchen gadget, or a child's toy. Also select another, plainer object, such as an oval or diamond shape.

Position your first interesting-shaped object off-center, diagonally on your paper. Trace completely around it, including any holes like the scissors handles. Move it to a different location, different angle, perhaps overlapping the first tracing. Trace around it again. It's up to you whether to stop at the overlap (putting the second tracing "behind" the first) or to continue tracing (as if the first tracing is transparent).

Repeat with your second interesting-shaped object, if desired. Mine was a spoon handle, traced inside the left-hand tea strainer.

Now for your "plainer" object. Position it so it will connect or extend the other objects. Trace it, except where it overlaps (keep it "behind" the other objects). Repeat a few times.

Add free-form curved or straight lines to echo or continue some of your traced lines, to make a new shape, or to criss-cross some blank areas. Consider drawing a small picture inside a space, like I did with my window frame.

Color (but feel free to leave some white space). Enjoy.

For more drawings to try, click on "try this" just below, or in the menu bar in my blog header, or in the label list on the right.

Friday, April 20, 1973

Try This - Doodling on a Tan Card

Updated July 2009

First, please read my post, "Anybody Can Draw," if you haven't already. And please don't copy my drawing - but do feel free to use it to inspire your own.

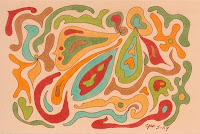
To try this, draw a 4x6" rectangle, or use an unruled 4x6" index card. Draw 4-5 irregular shapes, scattered across the space. They can be curvy, as shown here, or jagged, like my spiky abstract drawing.

Then draw a few shapes that echo or roughly mirror your first shapes. Example - the three shapes in the upper left of my drawing. Keep going until you've filled up your space pretty well.

Draw some small circles or shapes inside some of your bigger shapes. Color. Enjoy.

For more drawings to try, click on "try this" just below, or in the menu bar in my blog header, or in the label list on the right.

Thursday, April 19, 1973

Try This - Geode

Updated July 2009

First, please read my post, "Anybody Can Draw," if you haven't already. And please don't copy my drawing - but do feel free to use it to inspire your own.

To try this, draw a 4x6" rectangle, or use an unruled 4x6" index card. Draw a small irregular oval or amoeba shape near the center of your drawing space. (Mine is colored dark purple.)

Pick a center point inside your shape, and draw straight lines (rays) radiating out from it. The rays should be varying lengths. Go about halfway around your center shape with the rays, and keep the outer ends of the rays at least 1" away from the edge of your drawing space.

Connect the outer ends of your rays with short, straight (angular) or curvy lines. (Mine are curvy.)

Now, on the opposite side of your center shape, draw curvy, jagged, or wavy lines connecting the outermost rays. (For an example, see my wavy shapes colored in green, yellow, orange, and light blue.)

Finally, draw a few wavy, irregular ovals around the outside of everything (for mine, see the outer rings colored in dark blues and purple).

Color. Enjoy.

For more drawings to try, click on "try this" just below, or in the menu bar in my blog header, or in the label list on the right.

Wednesday, April 18, 1973

Try This - Fish Doodle

Updated July 2009

First, please read my post, "Anybody Can Draw," if you haven't already. And please don't copy my drawing - but do feel free to use it to inspire your own.

To try this, draw a 4x6" rectangle, or use an unruled 4x6" index card. It also works well in a larger size like 8.5 x 11.

Warm up your arm by making circles and loops with your hand above the paper, but without touching it.

Then draw a large oval-like shape with loops inside it. Make the loops different shapes and sizes. If you have room, add some loops outside your main shape (like mine at the lower left).

Add some dots, stripes, and shapes inside your loops. If you have a blank space, you can add another shape, like the flower shape where my fish has his eye. Color, but feel free to leave some white space. Enjoy.

For more drawings to try, click on "try this" just below, or in the menu bar in my blog header, or in the label list on the right.

Tuesday, April 17, 1973

Try This - Bright Dots and Wavy Lines

Posted August 17, 2009

First, please read my post, "Anybody Can Draw," if you haven't already. And please don't copy my drawing - but do feel free to use it to inspire your own.

To try this, draw a 4x6" rectangle, or use an unruled 4x6" index card. Draw 8-10 wavy lines lengthwise across your drawing space. Let some of the lines curve away from each other, to make room for bigger circles.

Add various sized circles. Don't worry about perfect circles, but do try for smooth joins where you close your shapes. Let some of your circles be cut off by the edges of your drawing space. Color. Enjoy.

For more drawings to try, click on "try this" just below, or in the menu bar in my blog header, or in the label list on the right.

Monday, April 16, 1973

Try This - Two Shapes (Turtles)

Updated July 2009

First, please read my post, "Anybody Can Draw," if you haven't already. And please don't copy my drawing - but do feel free to use it to inspire your own.

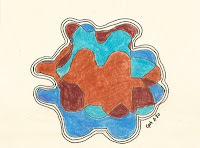
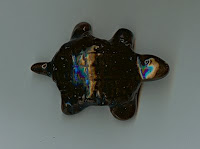
To try this, draw a 4x6" rectangle, or use an unruled 4x6" index card. Select an irregular object, about 3" long. Mine was a ceramic turtle that I made in grade school.


Place it on your drawing space, 1/2" or less off center. Trace completely around it.

Now move it, 1" or less, to the other side of your drawing space's center line. Trace completely around it again. Add curved or straight lines, if desired, to break up the blank space inside your tracings.

Draw one or two continuous lines around the entire image, about 1/8" to 1/4" apart. Color. Enjoy.

For more drawings to try, click on "try this" just below, or in the menu bar in my blog header, or in the label list on the right.

Sunday, April 15, 1973

Try This - Landscape with Animal

Updated July 2009

First, please read my post, "Anybody Can Draw," if you haven't already. And please don't copy my drawing - but do feel free to use it to inspire your own.

This is like my other examples with tracing (turtles, tea strainer) except that, instead of tracing a real-life object, you will create your own shape to trace. My frog panel drawing is another example where I made patterns that I traced around, a sitting frog and a jumping frog.

To try this, in addition to your drawing paper, you will need an extra piece of paper or a piece of lightweight cardboard like an index card.

First take your "extra" paper or card. On it, draw an animal as viewed from the side. Don't worry about how it looks. A body, head with ears, four legs, and a tail. Mine included a mane (colored red in my drawing.) Consider angling the front or back legs, like I did, for a moving animal. Now draw a smooth, curved line all around the outside of your animal drawing. (Think of an old-fashioned cookie cutter shape.) Cut it out with scissors along that line. This is your pattern.

Next, on your drawing paper, draw a 4x6" rectangle, or use an unruled 4x6" index card. (Note for card makers - Use any size that you'd like for your top card layer.) Place your pattern on your drawing space, perhaps at an angle if your animal is moving. Trace all around it, keeping your lines smooth and curved. Add a dot for the eye. Add lines to separate the legs if needed. Add a few more lines, like my animal's ear and tail, or extend the leg lines a little way up into the body.

For your landscape, add a wavy horizontal line for the horizon, a scalloped or curvy shaped cloud, and some ovals on one side for rocks. You can also add a road, like my drawing, by drawing a pair of curvy diagonal lines (you can improve on my example if you bring your lines closer together as they get near the top, for perspective).

Your drawing may look more finished if you double or triple some of your lines, like I did, by drawing similar lines alongside your cloud, road, rock, or horizon lines. Color. Enjoy.

For more drawings to try, click on "try this" just below, or in the menu bar in my blog header, or in the label list on the right.

Saturday, April 14, 1973

Try This - Star Circle

Updated July 2009

First, please read my post, "Anybody Can Draw," if you haven't already. And please don't copy my drawing - but do feel free to use it to inspire your own.

To try this, draw a 4x6" rectangle, or use an unruled 4x6" index card. Draw or trace a large circle on it. Your circle may be cut off on one edge of your drawing space, like mine is on the top. In the center of your large circle, draw or trace a small circle, about 1" in diameter.

Around the center circle, draw a five-lobed star shape, with rounded "points" and rounded at the inside turns, where it nears the center circle. Your shape will look more interesting if it's not "perfect," so don't aim too hard for symmetry, but do aim for smooth turns and a smooth join where you connect the end of your star's line to its starting point. Remember, it's OK to move your paper - try turning it as you draw your star shape.

Now draw stripes or curves, following your circles or along the star's lobes. If you like, you can segment a shape, like I did with my largest star shape, to divide it into smaller shapes for coloring. Inside the small circle, you may want to draw stripes or more circles, or another small star, or a pinwheel like I drew.

To ground your image, draw a few horizontal lines with your pen, or perhaps with just your markers, like mine.

Color. Enjoy.

For more drawings to try, click on "try this" just below, or in the menu bar in my blog header, or in the label list on the right.

Friday, April 13, 1973

Try This - Bookplate Landscape

Updated July 2009

First, please read my post, "Anybody Can Draw," if you haven't already. And please don't copy my drawing - but do feel free to use it to inspire your own.

To try this, draw a 4x6" rectangle, or use an unruled 4x6" index card. Place it vertically -"portrait" orientation instead of "landscape."

Draw a line of upside-down U's or scallops across the top. It's OK if they are cut off at the top, like mine. Draw a few similar lines alongside your first line.

Just above the center of your drawing space, draw a sun, a crescent moon, or several star shapes. Add some curved lines, lifting your pen at your sun-moon-star shapes, so the lines go "behind" them. You can add some dot or line patterns inside your new curved stripes.

For the bottom half of your drawing space, draw a line of tree tops with a few scallopy curves and upside-down V's. You can also draw some tree trunks - pairs of almost-vertical lines up from the bottom, centered under a curve or V. Make each pair of lines a bit closer together at the top than at the bottom. Consider adding a branch or two, by leaving a small gap in one of your vertical lines, then angling a pair of branch lines up for a short distance.

Now draw the leafy part of your trees, using rounded swirling lines under your curved tree tops, and angular lines under your V's. Color (or leave uncolored). Enjoy.

For more drawings to try, click on "try this" just below, or in the menu bar in my blog header, or in the label list on the right.

Thursday, April 12, 1973

Try This - Heart Drawing

Updated July 2009

First, please read my post, "Anybody Can Draw," if you haven't already. And please don't copy my drawing - but do feel free to use it to inspire your own.

To try this, draw a 4x6" rectangle, or use an unruled 4x6" index card. Draw a heart shape slightly off to one side. Don't worry about a perfect shape - for this drawing, symmetry is not important. An imperfect heart shape will go better with your (likely to be imperfect) ovals.

Note: if you do want a perfect heart shape, you can cut a pattern, as many of us learned in childhood. Fold paper in half, cut a comma shape, unfold, look at what you have, refold and recut until you like it. Then trace around it for your drawing. That's how I drew the hearts for 12/23 of my 2008 Advent Calendar drawing, and also the heart-shaped outline for Confined in the Heart.

If you like, draw little scallops around the edge of your heart shape. Add tiny hearts, curvy triangles, pointed ovals, or comma shapes inside your heart shape. This necklace may give you some ideas.


Next, draw 6-8 small hearts on one side of your large heart shape. Draw some crescent shapes on the other side, and top them with a few simple flower shapes, or curvy commas and ovals for petals.

Add two oval lines that reach all around, making a ribbon below the shapes. Perfection is not the goal here. My drawing, for example, has very imperfect ovals. You can double each line (a second line about 1/8" from the first line) or add little scallops like mine.

Color. Enjoy.
(Note: I used muted colors for my drawing, but you may want to try some bright colors. Don't feel limited to pink or red.)

For more drawings to try, click on "try this" just below, or in the menu bar in my blog header, or in the label list on the right.

Wednesday, April 11, 1973

Try This - Outlined Words

Posted January 2010

First, please read my post, "Anybody Can Draw," if you haven't already. And please don't copy my drawing - but do feel free to use it to inspire your own.

If you can write or print neatly and legibly, you can successfully do this technique. It does not require calligraphy skills or "beautiful" handwriting. Simply outlining your words will make them look much more polished and finished.

STEP ONE: To try this, draw a 4x6" rectangle, or use an unruled 4x6" index card. Select a few different colored markers. SLOWLY write or print a few words with the fine tip of your marker, or the pointed tip of a chisel tip marker, or brush tip - whatever is comfortable for you. By moving slowly, you will have better control, and you will also create a somewhat thicker line. A few tips:
  • Make your loops and circles a bit larger (more open) than usual.
  • Write your words at different angles to look more interesting, and also to conceal any unevenness in the letters.
  • Try using several different colors for the letters of one word.
  • Use more than one style of writing, such as printing and cursive writing.
See the drawing above, for Step One of my drawing.

STEP TWO: Now, take your black drawing pen and outline the letters, tracing all the way around the outer shape of the word. Keep a smooth line and flow as you go around. Next, trace the insides of the letters, such as the inside circle of the o's or the inside half-circle of the e's. A few tips:
  • You don't need to draw your outline exactly alongside your colored lines. Instead, you can leave some blank space as you draw the outline, if you want a thicker-looking word. After you finish outlining, go back and color in the blank spots.
  • This can also be a good way to fix a letter that looks too short. For example, my "l" in "light" looked like an "e," so I made it taller when I outlined it.
  • Your outline should go around, not cross over, any loops, such as my "h" in "hope" and "l" in "light."
See the drawing at the right for Step Two of my drawing. I also added a few simple flower shapes, colored with the same colors as my words, to fill in some of my empty spaces.

STEP THREE: Fill in the blank spots remaining in your outlines. Enjoy.

For more drawings to try, click on "try this" just below, or in the menu bar in my blog header, or in the label list on the right.

Tuesday, April 10, 1973

Try This - Flowers in Shallow Bowl

Updated July 2009

First, please read my post, "Anybody Can Draw," if you haven't already. And please don't copy my drawing - but do feel free to use it to inspire your own.

This drawing looks complicated, but it's not. It is time consuming to draw and color, but you may find that you enjoy the process (I know I did). To try it, draw a 4x6" rectangle, or use an unruled 4x6" index card.

With pencil, very lightly draw a shallow bowl shape, a little more than 1" high. (Look at the right side of my bowl for its height, because the left and center is partly covered with flowers.) Or, to get a more symmetrical shape, fold a piece of paper or an index card (lined paper will make it easier) and cut straight across the top and bottom, with a curve for the sides. Unfold it and trace around it lightly with pencil.

Next, about halfway down the side of the bowl, lightly draw a straight horizontal pencil line for the table top. Do NOT ink your bowl or table lines yet.

Now switch to ink. Draw a few flowers scattered above your bowl. My flowers have circles or ovals for their centers, just big enough to color, with 6-8 wedge-shaped petals. Try curving both ends of the petals.

Continue drawing with lots of similar flower shapes in varying sizes. I have dozens of flowers, but you can do fewer. Don't try to make all your flowers identical, just similar. Let some flowers overlap the bowl or table lines.

Be sure to show some flowers from a side view, by drawing a narrow oval center (vertical or horizontal) with very short petals on one side.

Add some stem lines in the blank areas between your flowers, and some pointed oval leaves poking out of the mass of flowers.

Ink the bowl shape and the table line, where they are not covered with flowers. Before coloring, gently erase any pencil lines that are still visible. Add a pattern to the bowl or table top if you like. My coloring was complex for the flowers, but simple coloring would also look good.

Color. Enjoy.

For more drawings to try, click on "try this" just below, or in the menu bar in my blog header, or in the label list on the right.

Monday, April 9, 1973

Try This - Rosette

Posted November 16, 2009

First, please read my post, "Anybody Can Draw," if you haven't already. And please don't copy my drawings - but do feel free to use them to inspire your own. To see the original posts with these drawings, click here for orange and here for blue.

If you can trace a circle shape from a jar lid and make "V" and "U" shaped lines, you have all the drawing skills you need for a rosette. There's nothing tricky about it. You'll need some patience to draw all the little V's and U's, but you might find it relaxing, perhaps even meditative, as I do.
  • If you'd prefer something less detailed, click here for other "try this" opportunities, or click on "try this" in the labels list on the right, or in the menu bar in my blog header.
To try a rosette of your own, first draw very lightly, with a pencil, three concentric circles. The biggest should be about 3 inches across. You can trace around small cans, spice jar lids, tiny bowls, or glasses. See the three circles in Example A, below, to get the idea, but don't make them as dark as that! (I made mine dark so you can see them.) They should be drawn very faintly, to be easily erased when you finish drawing and before you start coloring.

Next, choose a foundation shape. Your rosette will be built on this shape. In Example A on the right, my heavy lines show you the foundation shape that I used for my orange and yellow drawing. But when you draw your foundation shape (after reading about Example B below), don't make your lines extra-heavy like that. Except for your very light pencil circles, all your lines will be the same weight - whatever your drawing pen gives you.


For your foundation shape, you can choose from many different shapes - see Example B to the right for a few of them. To read my handwritten notes, double click on the picture for a larger version. Please notice a few things about the line that forms each of the different foundation shapes:
  • It moves back and forth between the inner and middle circles as boundaries.
  • It's a continuous, unbroken line. (Though it's fine to start and stop as you're drawing it.)
  • It can be very irregular! Don't try for a perfectly regular foundation shape - it's not important for this drawing. An imperfect shape will make your rosette more interesting as you go along.
Which shape should you use? Really, it won't make much difference to the finished rosette, because it pretty much disappears as you work with it. So just choose one that you feel will be easy for you to draw.

Now, with your drawing pen, draw your foundation shape with one continuous line, using your smallest (lightly penciled) circle for the inner boundary, and your middle circle for the outer boundary. As you draw, don't worry about the number of rays or petals - five or more will work, and an odd or even number doesn't matter.

Next, you will add as many sets of V's and U's as you like! Please read the tips below. Also look at my two-page Example C at the bottom for a rosette at various steps along the way. In my twelve little drawings (C-1 through C-12), I used blue to highlight the V, U, or straight line that I was adding.

Tips:
  • Always finish a complete round of V's or U's before starting a new round. This will avoid confusion, as I've learned the hard way.
  • A variety of V's and U's will make it more interesting.
  • Use your lightly pencilled circles as guidelines. They will help you keep your overall circular shape, although your V's and U's will vary.
  • Keep your outer edge "rough," so you always have easy places to anchor your V's and U's. This tip will make more sense when you look at Example C below.
  • Every rosette will be different. There is no "right way" to draw it.
  • When is it finished? Whenever you like! In Example C, I could have stopped anywhere from C-3 onward.
  • Remember to gently erase your circles. Then color! Enjoy!
Double click either picture below for a larger view.


Edited Nov. 21, 2009: See below for colored version of rosette from Example C above.

For more drawings to try, click on "try this" just below, or in the menu bar in my blog header, or in the label list on the right.